When learning to ring, one of the most difficult things is interpreting the method diagram, especially as there are so many variations in style. It is impossible to explain everything you could possibly wish to know on one page. If you find this information is insufficient, then please ask your tutor to explain in more detail.
There are no hard and fast rules to learning methods. Some people prefer to turn the diagram on its side, as this may help learning when pupils are often told to think of their places as being a staircase, going up slowly and coming down quickly.
Reading and Interpreting the Diagram
On this page we try to describe the parts of the diagram and explain the most important information it conveys to a learner. The representation of Bob and Single calls in the diagram are mentioned briefly, but without any explanation of what the ringer does when a call is made. Calling positions are not explained, as they are used by more experienced ringers, who conduct touches. Unfortunately there are many different variants printed, so this is a general guide to interpretation.
Diagram Format
Starting Rounds: The top of the first column is the Lead Head of the first lead, so this corresponds to the rounds being rung before the methods starts.
Lead Head: When the treble has done all its work this is the end of the lead. Although many people call this the 'lead end' it is the head of the next lead and is correctly known as the 'lead head'.
Place Notation: is a form of shorthand used to describe the method without having to draw a diagram. When methods are named in the 'Ringing World' newspaper, the place notation is printed so that other ringers can ring it if they wish. If the method is symmetrical, as most are, only half the notation is printed. The lead end notation is required to complete the data. In this example the notation is x14x36x16 le 16. Many advanced ringers can interpret place notation while ringing and don't have to see a drawing. more on place notation...
Blue Line: In diagram books it is usual to emphasise the path of the heaviest working bell. Some popular books did this by printing in Blue ink which gave it its name. Sometimes it is just a thicker Black line. However diagrams created by computer software can emphasise any desired bell.
Bell Start Positions: these are the starting positions of other working bells in relationship to the Blue line. These correspond to the position of the Blue line at the lead head.
Calling Position Letter: this abbreviation is used to show conductors where to place the Bob and Single calls. In this example 'H' for Home, but numbers may be used in some methods.
Chart Layout and Odd Bell Tenor Removal
Methods are broken down into sections known as leads. Doubles methods usually have 4 leads with 10 changes per lead, so it is possible to print the whole method in a single column as there are only 40 changes. When moving up to higher numbers of bells it is not possible to print the method in one column and still read the printing. Cambridge Surprise Major has 7 leads of 32 changes, the 224 rows are usually printed in 7 columns. The last row at the bottom of the column is repeated as the first row in the next column. The end row 15738264 in column 1 is illustrated in the top part of the image.
In odd bell methods (Doubles 5, Triples 7, Caters 9 and Cinques 11) the tenor rings last (Covers) in every row. The covering tenor is not normally shown in diagrams. This small extract of Grandsire Triples shows the same section of changes with and without the tenor. The absence of the tenor may be a little confusing when seeing a method diagram for the first time.
Your Places and Who to Follow
The left hand chart shows the work of the 4th Bell in Blue. At the head of this lead the order of bells are 142635 the fourth bell is the second bell to ring and therefore is in 2nd place. Each coloured column represents the place that bell is in. The fourth moves into the first column and leads twice, before going up to 2nd place, 3rd place, 4th place, 5th place and making two blows in 6th place, then dodges down to 5th place.
Pupils may find the concept of places difficult to understand and begin by learning which bells to follow. The right hand chart shows the work of the 4th Bell in Doubles and 6th in Minor. The red coloured bells are the ones you follow. Note that when leading, you follow the last bell on the row above. In 'Odd' bell method stages, such as Doubles (5) or Triples (7) you lead off the tenor, which is shown here, although omitted from normal diagrams. When ringing 'Even' bell method stages, such as Minor (6) or Major (8) you lead off the last bell on the row above, not the last bell in the current row.
The Circle of Work and the Diagram
A method can be represented by a circle of work. In this diagram for Bob Minor, the 2nd bell performs the work in the order 34 Down, 56 Down, 56 Up, 34 Up before returning to the start position at 2nds. Whereas the 5th Bell starts in a different position but performs the work in the same order. In this case 34 Up, 2nds, 34 Down, 56 Down and ending at 56 Up.
For illustration purposes, the method diagram is shown here as five separate leads, whereas the 'Ringing World Diary' has it drawn in one column. Each of the leads can be associated with the circle of work, by using the 'Bell Start Position' number in the method diagram.
Method diagrams printed in books are tailored for one bell, which is shown as a Blue line, and is usually the heaviest working bell. Usually the pupil learns on a lighter bell, not the heaviest. Online facilities such as my 'Change Ringing Toolkit' can produce diagrams for any bell you wish to ring. However if all you have is a printed diagram and are not ringing the Blue Line bell, you have two options.
1: If you are at an early stage of ringing and need to know who you are following as well as your work, find your bell in the lead head of the first column and work your way down, noting your own bells place and who is before you.
2: Find your bells number in the circle 'Bell Start Position' and note the places of the Blue line. The work will still be the same as using No.1 above, but the bells indicated on the chart with the exception of the treble, will be different as this is the Blue line for another bell.
Bobs and Singles
When the conductor calls a Bob or Single the usual pattern of work changes and the bells start the next lead in a different order than they would have without the call. It can be confusing to understand how this is represented in the diagram.
Interpreting the differences
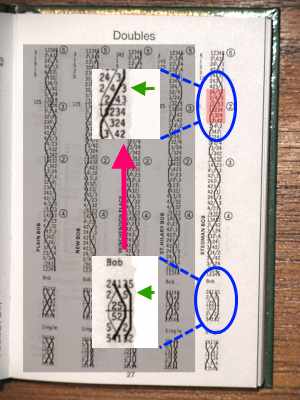
The photograph of a page in the Ringing World Diary is shown to the right. A section three changes either side of the lead end of the first lead is coloured Pink. The Bob (or Single) section replaces the pink section when the call is made and a different order of bells are created.
In single hunt methods, such as Plain Bob and the other methods on this page, the call comes when the treble is in second place. Confusingly the calling position is not always shown in the diary for some methods. ( I do wish they would standardise their layouts ). In this photograph, the Green arrow shows when the call is made.
The call is made one whole pull before the variation to the pattern occurs - just as in called changes. Therefore the order of bells above the horizontal line separating the leads are the same for a plain lead and both calls.
Place Notation - Very Briefly
Place notation shorthand allows methods to be described without the complication of drawing a diagram. It indicates how bells move between successive rows. If all the bells cross, then either a cross 'X' or a hyphen '-' is used. If any bells keep the same place ( make places ) that place number is listed, starting from the lowest number. For example '14' means the bell that is leading '1' leads on the next row too, the bell that is in 4th place '4' will be in 4th place in the next row too. As '2' or '3' are not written down, the bells in 2nd and 3rd places swap over. If successive rows don't all cross 'X', then a dot is used to separate the notation for example. '34.12.34x16'
There is a shorthand to the shorthand - all very confusing for the inexperienced - for example in '12' the 2nd place bell remains in 2nd place, the bell who is leading can't move out to 2nd place as it has nowhere to go, this implies it must remain leading, so '12' can be abbreviated as '2'. However unless the rules are strictly defined, abbreviated notation '4' could mean either '14' or '34'. To avoid any confusion the Central Council of Church Bell Ringers method files do not use this form of abbreviated notation.
In methods that are symmetrical around the half way point only half of the lead and the lead end is recorded. So Shipway Place 3.145.5.1.5 le 125 is symmetrical about the last '5' before the 'le'. To expand it you omit the last term (the underlined five) and work backwards through the notation and add the lead end. The full notation for Shipway is expanded to 3.145.5.1.5.1.5.145.3 le 125. Methods symmetrical in this way are known as 'Palindromic'.
Place notation is very useful as it is easily printed in a news paper or sent by text message. By using the notation, its possible to fully reconstruct the method diagram by hand on a piece of paper, or with a computer program.